• Facebook
  • Pinterest
  • Youtube
Crystals & Crochet
  • Home
  • Profile
  • Crystals
    • Amazing Adventures
    • Domestic Goddess
    • Garden Glory
    • Words Of Wisdom
  • Crochet
    • Crochet Blog
    • My Designs & Patterns
      • Afghan Squares
      • Blankets / Afgan
      • Crochet-A-Long
        • Cosmic Cal
        • Mandala Madness
        • Whispers from the Past
        • Heart of Friendship
        • Sweet Caroline
      • Cushions
      • Ponchos / Wraps / Shawls
    • My Tutorials
      • Basics
      • Color
      • Joining Squares
      • Special Stitches
  • Blog
  • Contacts
    • Terms of Use
    • Disclosure and Privacy Policy
Select Page

Mandala Madness Part 6

Mandala Madness Part 6

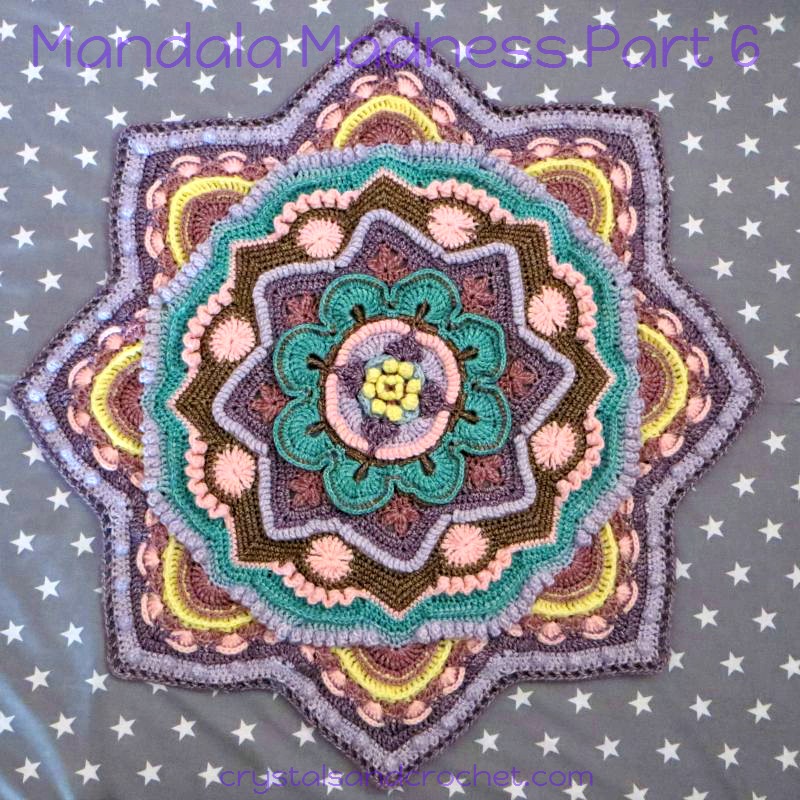
Can you believe we are a third of the way through this madness!!

A few of you spotted that there was no comment or description from me about last week’s instalment. It is very much combined with this part, as we work back into an eight pointed star.

Octagrams formed from overlapping squares often emphasize duality: yin and yang, male and female, spiritual and material. Squares are often connected with the physical world: four elements, four cardinal directions, etc. Together, they bring balance. They are used in many different faiths, and belief systems, all around the world and date back to pre-Ancient Egypt.

Number 8 tells you to step into your personal power and have faith and trust in your own abilities, skills and talents, and to use them to their highest potential.

So with that said, as you start this week, the very first round is one that will test your patience, and your concentration.
It is not hard, but there is a lot going on, so please take your time, and go step by step.

To me each piece of work I do, I want to learn, grow, and improve. This is done by taking time to focus on what I am doing, and to enjoy each and every step of the journey. It is not about getting from A to B in the fastest possible time!

Maybe this is the week to really take the time to “feel” what the colours you have chosen mean to you, and if you haven’t already, then find a name for your own personal Mandala Madness, to make it absolutely unique to you.

Also this week you will need to turn your work in round 44 and then turn back for round 45, this will make a huge difference to the way your work looks, but please be very aware of those SNEAKY…HIDDEN stitches.

And…because some of you have asked for some measurements for guidance at the end of this week mine measure as follows:
Merino Soft        ~ Rainbow Madness  ~  4mm hook     ~  26 inches / 66 cm
Colour Crafter    ~ Purple Passion        ~  4.5mm hook  ~  30 inches / 76 cm
Stonewashed xl  ~ Big Earth Momma  ~ 5.5mm hook  ~  37 inches / 94 cm

♥ Please remember this is my design and is covered by copyright law. You may share a link to this page with anyone, you may print off the photo or written tutorials for your own use, but please do not alter or change in any way.
Please love and respect me, as I love and respect you. ♥

♥ If you haven’t read the introduction post, then please find it here. You will find all the information on Yarn Packs, how much yarn you will need, hook sizes, the finished size of your blanket and all the resources available.

♥ It is worth book marking the main Mandala Madness page as it will contain all the posts about the project and each weekly part.

♥ You may also like to add this CAL to your Ravelry Queue.

♥ I also have a group on Ravelry, which covers all of my designs. I will try to check in there every day. I now have some lovely moderators, thank you so much for your help ladies. ♥

♥ I suggest taking a look through the photo tutorial here before downloading the pdf to work from, but if you just can’t wait to get started I have put all the pdf downloads together.

♥ And for those of you who like to follow the Video Tutorial by Esther Dijkstra from itsallinanutshell.com, just click here and the link will take you straight to the video for this part.
Again my love and thanks to Esther for the amazing job she has done with these videos. ♥


♥ PDF downloads

♥ Written pattern with just a small picture. Mandala Madness part 6 written pattern
♥ Photo tutorial.  Mandala Madness part 6 photo tutorial

♥ Translations

For the translated versions of the CAL, please click on the links here and it will take you straight to your preferred language. With no need to scroll down further on this page.
And another HUGE thank you to the awesome team of translators, from the CAL – Crochet A Long Facebook group, for the fantastic job they have done with all the translations. ♥


♥ Afrikaans    Mandala-Madness-Part-6-Afrikaans
♥ Dutch          Mandala-Madness-Part-6-Dutch
♥ Danish        Mandala-Madness-Part-6-Danish
♥ Finnish       Mandala-Madness-Part-6-Finnish
♥ French        Mandala-Madness-Part-6-French
♥ German      Mandala-Madness-Part-6-German
♥ Greek          Mandala-Madness-Part-6-Greek
♥ Hebrew       Mandala-Madness-Part-6-Hebrew
♥ Korean        Mandala-Madness-Part-6-Korean
♥ Persian        Mandala-Madness-Part-6-Persian
♥ Polish          Mandala-Madness-Part-6-Polish
♥ Russian       Mandala-Madness-Part-6-Russian
♥ Spanish       Mandala-Madness-Part-6-Spanish
♥ Swedish      Mandala-Madness-Part-6-Swedish

Russian Video Tutorial
Huge thanks to Natalie for this ♥
Thank you to Carmen for the Spanish video tutorial


Mandala Madness Part 6

mm part 6

For the purposes of this tutorial I am using Scheepjes Merino Soft and a 4 mm Clover Amour Crochet Hook.

The colours used in each round are listed below.

mm round colours 6

US terms used throughout.

 Abbreviations

Abbreviations

Hints: Are typed in italics and coloured purple, they are to help and guide you and hopefully make life a little easier.
Reference to photos is [P] with the relevant photo number.
* Repeat instructions between asterisks the amount of times specified. This is normally a repeat for a complete side and will consist of multiple instructions.
() – Repeat instructions between parentheses the amount of times specified. This is a lower level repeat.

Special Stitches

Sc3tog: Hook through indicated stitch and pull up a loop, repeat in next stitch, and in the following stitch, yarn over and pull through all four loops on hook.

Beginning dc3tog: ch 2, [counts as 1st partial dc] In next stitch, yarn over and pull through two. Two loops on hook. In next stitch, yarn over and pull through two. Three loops on hook. Yarn over and pull through all three loops to complete the stitch.

Dc3tog: Yarn over, put hook through indicated stitch, yarn over and pull through two.
Two loops on hook. In next stitch, yarn over and pull through two. Three loops on hook.
In next stitch, yarn over and pull through two. Four loops on hook. Yarn over and pull through all four loops to complete the stitch.

Bobble Stitch: make a dc5tog cluster. In indicated stitch, make 5 partial dc’s, yarn over and pull through all six loops on hook. The bobble is formed as you make the next stitch.


Instructions

Hint: This round looks far more complicated than it is, I have listed it to make it easier to follow. All back loop stitches are worked in front of ch-1 spaces and not over them.

41. Join with a standing sc through ch-1 space between any 6th and 7th popcorn [R34] and 4th tr of shell, sc in next sc, sc through ch-1 space between 7th and 8th popcorn [R34] and 1st tr of next shell,
*bpsc in next 3 sts [P2], bldc in 3rd dc in shell from [R39] [P3], fpsc around sc,
bldc in 5th dc in shell [R39], bpsc in next 7 tr,
bldc in 3rd dc in shell [R39], fpsc around sc,
bldc in 5th dc in shell [R39],
bpsc in next 4 tr, bphdc in next tr, bpdc in next 2 tr,
bltr in 3rd dc in shell [R39], fpdc around sc,
bltr in 5th dc in shell [R39],
bpdc in next 2 tr, bphdc in next tr, bpsc in next 4 tr,
bldc in 3rd dc in shell [R39], fpsc around sc,
bldc in 5th dc in shell [R39], bpsc in next 7 tr,
bldc in 3rd dc in shell [R39], fpsc around sc.
bldc in 5th dc in shell [R39], bpsc in next 3 tr,
sc through ch-1 space between 6th and 7th popcorn [R34] and 4th tr of  shell, sc in next sc, sc through ch-1 space between 7th and 8th popcorn [R34] and 1st tr of next shell.*

Repeat from * to * 7 more times, omit last group joining popcorns.
Join to standing sc with a sl-st.
Stitch Count: Per repeat: 3 sc, 4 fpsc, 28 bpsc, 2 bphdc, 1 fpdc, 4 bpdc, 8 bldc, 2 bltr.
Total: 24 sc, 32 fpsc, 224 bpsc, 16 bphdc, 8 fpdc, 32 bpdc, 64 bldc, 16 bltr.

r41

42. Make a beginning dc3tog over next 3 sc,
*dc in next 24 sts, 3 dc in next st [fpdc], dc in next 24 sts, dc3tog over next 3 sc.*

Repeat from * to * 7 more times, omit last dc3tog.
Join to starting dc3tog, fasten off, and secure ends.
Stitch Count: Per repeat: 51 dc, 1 dc3tog.
Total: 408 dc, 8 dc3tog.

 r42

43. Join with a standing sc in 2nd dc of any 3 dc group at top of point, make 2 more sc in same st,
*sc in next 23 sts, (sc3tog over next 3 sts) twice, sc in next 22 sts, 3 sc in next st
[which will be the 2nd dc of 3 dc group].*

Repeat from * to * 7 more times, omit last 3 sc.
Join to standing sc with a sl-st.
Stitch count: Per repeat: 48 sc, 2 sc3tog.
Total: 384 sc, 16 sc3tog.

r43

Hint: to keep neat even loops when working sc3tog fold your work in half after making 1st sc3tog.

hint3

Hint: For this round you will be working on the wrong side to have your bobbles sitting pretty on the right side. Please remember that over the next  2 rounds you will be turning your work and so the working loops will reverse, just as if you were working in rows rather than in the round.

Hint: take care not to miss 1st st after bobble especially the 1st st after the point space bobble.

 44. Ch 1, TURN YOUR WORK [wrong side facing you], and sc in same st, sc in next 4 sts,
*(make a bobble st in next st, sc in next 5 sts) 3 times, sc3tog over next 3 sts
[both sc3tog plus sc], (sc in next 5 sts, bobble st in next st) 4 times,
[Hint: the 4th bobble will fall in the 2nd sc in 3 sc point group] sc in next 5 sts.*

Repeat from * to * 7 more times, omit last 5 sc.
Join to 1st sc with a sl-st.
Stitch Count: Per repeat: 40 sc, 1 sc3tog, 7 bobble st.
Total: 320 sc, 8 sc3tog, 56 bobble st.

r44

45.Ch 1 and TURN YOUR WORK, the right side is now facing you again. Hdc in same st [last sc before bobble st], 3 hdc in bobble st,
*hdc in next 22 sts, [Hint: 6th, 12th, 18th hdc will fall in the top of the bobble sts] dc3tog,
hdc in next 22 sts, [Hint: 5th, 11th, 17th hdc will fall in the top of the bobble sts],
3 hdc in next st [bobble at top of point].*
Hint: don’t accidentally skip those sneaky stitches, hidden by the bobble. [P2]

Repeat from * to * 7 more times, omit last 4 hdc.
Join to 1st hdc, fasten off, and secure ends.
Stitch Count: Per repeat: 47 hdc, 1 dc3tog.
Total: 376 hdc, 8 dc3tog.

r45

46. Join with a standing dc in 2nd hdc of 3 hdc group at top of any point, (ch 1, dc) in same st, *(ch 1, skip next st, dc in next st) 23 times, ch 1, skip next st, in next st (dc, ch 1, dc).* Hint: the 12th dc after point group on each side will fall in the dc3tog, and the new point space falls in the 2nd hdc of point group of 3 hdc.

Repeat from * to * 7 more times, omit last point group.
Join to standing dc, fasten off, and secure ends.
Stitch Count: Per repeat: 25 dc, 24 ch-1 spaces.
Total: 200 dc, 192 ch-1 spaces.
[Remember ch-1 point spaces are not included in any stitch count]

 r46

 Hint: leave weaving the ends of Round 46 until after you have done the next section as it will look so much better to hide them under the next round. Also your work will curl over slightly.


You now have another beautiful star and have completed part 6…

See you next week.

blog sig 2


Please ensure you enter your email address correctly. 🙂

[wysija_form id=”2″]

Save

Save

33 Comments

  1. Nadia Bowd
    Nadia Bowd on 1st April 2018 at 10:36 am

    Hi Helen,
    Just down the road from you – High Wycombe.
    Thankyou for this beautiful pattern.
    I am thoroughly enjoying seeing it grow.
    I’ve found it easy to follow but I now find myself stuck at what is probably the easiest point!
    Very end of row 42 – do u slip stitch at the bottom of the beginning dc3tog or the top?
    Many Thanks
    Nadia

    Reply
    • Nadia Bowd
      Nadia Bowd on 1st April 2018 at 10:47 am

      Ignore, crochet eyes and late nights!
      Have a lovely Easter

      Reply
  2. Theodore
    Theodore on 1st March 2018 at 11:31 pm

    I’m stuck on row 44. I’ve got the right amount of sc and sc3tog from the previous row, but for some reason I’m only able to do two bobbles out of the three that are supposed to be done. Please help, I’m extremely frustrated.

    Reply
  3. Karen
    Karen on 6th March 2017 at 4:49 pm

    Thank you, again, Helen, for your beautiful contribution to this life! I’m on Round 44 and am still in love with this project. As you suggested, I’ve named my piece, and it only came to me this morning. One of my dearest friends is expecting her first grandchild, a little girl. My friend’s name is “Eileen”, but she pronounces it “Ell-EEN”. Her mother was Ellen and her daughter is Ellen, so I thought it only fitting that my piece be, “Elle”, the French word for “she”.

    Reply
    • Helen
      Helen on 6th March 2017 at 8:00 pm

      Wonderful 🙂 Eileen is my mum’s name, and “she” sounds perfect for you 🙂

      Reply
  4. Loes W
    Loes W on 3rd November 2016 at 8:02 pm

    Thank you Helen for the exellent tutorials, I love the Mandala Madness. All those beautiful and unknown crochet stitches. The blanket become every time more beautiful.

    Reply
  5. Ning Zhang
    Ning Zhang on 16th September 2016 at 7:24 am

    Hi Helen, i just want to thank you again, for i have finished the part 5 now. I have been worrying about so much that i might not be able to make it. Now i am so proud of myself and also so proud of you. Your written pattern is fabulous for anyone to learn it here. I have struggled a lot at some points but i perfectly succeeded finally. The stitches are totally write now. Thank you so much for the awesome job!

    Reply
    • Ning Zhang
      Ning Zhang on 16th September 2016 at 7:26 am

      oh i made a mistake, i have finished part 6 already:))

      Reply
      • Helen
        Helen on 16th September 2016 at 9:22 am

        Well done 🙂

        Reply
  6. Karen
    Karen on 31st August 2016 at 11:07 pm

    I have just finished part 5. Each round I am so afraid I won’t be able to do it correctly but so far it is looking really good. I have only been crocheting for a few months. Thanks so much for the pattern and the videos.

    Reply
    • Helen
      Helen on 1st September 2016 at 8:36 am

      You can do it 🙂 the videos are a great help when you are starting, especially with new techniques or stitches.

      Reply
  7. Pamela
    Pamela on 6th August 2016 at 10:11 pm

    I am beginning to comprehend your “madness” Helen! I write, but I’ve been too timid to share my writing with the world. But working on your Mandala here, and taking to heart Elizabeth Gilbert’s lessons from her book Big Magic, I have made the decision to be brave and open myself up to the all of it: praise and criticism, success and failure.
    I took a break from the pattern at this point to return to the writing, but now I’m at another standstill. The complexity of your pattern helps my brain work out plot points and character.
    Thank you for sharing your creativity with us!

    Reply
    • Helen
      Helen on 7th August 2016 at 7:48 pm

      Always follow your dreams…. some may journey with you and others may choose not to…write from your heart, and you can not go wrong 🙂

      Reply
  8. Stephanie L. S.
    Stephanie L. S. on 23rd May 2016 at 8:59 am

    I really appreciated how you wrote out row 41. It made it so much easier to follow. Mahalo!

    Reply
    • Helen
      Helen on 23rd May 2016 at 3:16 pm

      Great, I have tried to make it as clear as possible 🙂

      Reply
  9. Sita
    Sita on 30th April 2016 at 12:55 pm

    I resisted for four weeks and finally succumbed. Of course I have been good enough to use the thread in my stash( even though it is a bit stiff and unyielding).
    Sorry, but I think there is a discrepancy in Esther’s video tutorial. In part 5, round 40, she is demonstrating dc instead of trebles?

    Reply
    • Helen
      Helen on 30th April 2016 at 4:55 pm

      Yes there is a mistake, I have put a note in my post for part 5 and I knoe Esther has also put a note, it should be tr, but doing dc is not a huge problem 🙂

      Reply
  10. Jasmine
    Jasmine on 30th April 2016 at 3:59 am

    In row 42 – the 3 DC in next stitch – is that supposed to fall into the FP stitch every time?

    Reply
    • Helen
      Helen on 30th April 2016 at 7:50 am

      yes it should, it is at the point 🙂

      Reply
  11. Barbara
    Barbara on 26th April 2016 at 6:51 pm

    I’m curious, you say at the beginning of this round, that we are one third of the way through. Does that mean if we look at the size of our piece at the end of round 5, that our finished piece will be 3 times this size?

    Reply
    • Helen
      Helen on 26th April 2016 at 10:35 pm

      It is an 18 week project, so at week 6 we are 1/3 of the way through 🙂

      Reply
  12. Name*
    Name* on 25th April 2016 at 6:24 pm

    Love your Mandala ! my very next Project to begin ! thanks a lot Hellen

    Reply
  13. Helena
    Helena on 24th April 2016 at 7:04 pm

    This is a beautiful mandala pattern. I am thinking of doing it in Elle crochet no 5, suppose it would be suitable to display on a table. Thanks for all your tips and tutorials, I have learned a lot of new things

    Reply
  14. Margitta
    Margitta on 24th April 2016 at 10:23 am

    Hallo Helen , heute möchte ich einfach mal Dankeschön sagen.Ich bin durch Facebook zu diesem CAL gekommen. Die Anleitung in Schrift , Bild und Video zu erstellen dafür meine Respekt. Ich weiß was es bedeutet Anleitungen zu erarbeiten. Werde versuchen an diesem Wochenende Teil 6 zu arbeiten und dann freue ich mich eine Woche auf den Nächsten 😉 Vielen Dank und liebe Grüße Margitta

    Reply
    • Helen
      Helen on 24th April 2016 at 12:17 pm

      Vielen Dank, so erfreut , Sie genießen es 🙂

      Reply
  15. Linda
    Linda on 23rd April 2016 at 9:41 pm

    What shape blanket will we end up with? Or will that spoil the surprise?

    Reply
    • Helen
      Helen on 23rd April 2016 at 11:12 pm

      In the intro post it tells you that it will be round 🙂

      Reply
  16. Simone
    Simone on 22nd April 2016 at 10:54 pm

    Oh It will be a mystery unfolding! I changed the colors of my Color Crafter, but I continue with your colorscheme.. ad now the bobbles will be darker than the rounds around them… I hope I can work on them tomorrow night!

    Reply
    • Helen
      Helen on 23rd April 2016 at 11:13 pm

      I’m sure it will look great 🙂

      Reply
  17. Ruby
    Ruby on 22nd April 2016 at 9:10 pm

    You are awesome ! We all have our global family that we connect with on a deeper level/dimension because of strongly felt ideas and attitudes about everything in our world. As I read the introduction for this CAL I immediately felt the tribe connection 🙂 and reading this weeks post cemented it further when you suggested naming our pieces because I already had (so cool) I have two in the works currently on is French provincial in pale yellow and midnight blue the other is forest medow done in greens , blues , and brown/cream color families. Thank you for your beautiful designs , paid and free they are beautiful and reflect who you are <3

    Reply
    • Helen
      Helen on 22nd April 2016 at 10:15 pm

      Bless you 🙂 beautiful names from a beautiful soul xx

      Reply
  18. Angie Oser
    Angie Oser on 22nd April 2016 at 5:46 am

    Where can I find the tutorial for this CAL? I am attempting to learn how to crochet with more than a SC and DC…

    Reply
    • Helen
      Helen on 22nd April 2016 at 2:47 pm

      If you go to the drop down box at the top with crochet, you will see Mandala Madness, that takes you to the main page and all the weekly parts, each part also has a link to a video by Esther which will helps you loads…enjoy

      Reply

Trackbacks/Pingbacks

  1. Introducing Mandala Madness CAL - Crystals & Crochet - […] 4 ♥  Part 5     14th April       Part 5 ♥  Part 6     21st April        Part 6 ♥  Part 7     28th…

Submit a Comment Cancel reply

Your email address will not be published. Required fields are marked *

My Info

003 (3)

Hi I’m Helen!

I LOVE anything and everything to do with crafting and creativity. Nothing gives me more pleasure than helping others to learn and achieve their dreams.

You can also find me on Facebook and Pinterest, by clicking the little icons at the top of the page.

Partners

My Recommended Suppliers

Subscribe to Our Newsletter

Subscribe to our newsletter and keep up to date with all our news.

Check your inbox or spam folder now to confirm your subscription.

Quick Links

  • Home
  • Profile
  • Blog
  • Crochet
  • Crystals
  • Words Of Wisdom
  • Contacts
  • Facebook
  • Pinterest
  • Youtube
© Crisp Webdesign
45 Primrose Hill, Widmer End, Bucks, HP15 6NS