Securing ends…

Ok I know, so many people hate weaving in ends!

But if you want your project to be loved and used for a long time, then it needs to stand up to everyday wear and tear. Many of the items you make will be washed many times, especially items made for children.

A lovey won’t be loved for long if it falls apart.

A doll or teddy will soon be sad and abandoned in a corner, with no more hugs or cuddles, if it has come unravelled.

That beautiful blanket or afghan you made will find its way to the back of a cupboard, no one will praise or admire a holey heirloom.

When you have put hours and hours of your creativity, skill, and love, into making a beautiful piece of work, taking just a little bit more time will ensure your skill will be loved and admired for many years to come.

There are many ways to secure the ends of your work.

This is the way I work, after trial and many errors, and having to repair items I have made.

This is the way I ensure no ends ever work loose.


Working over the ends just is not enough!

Maybe for something that is never going to be touched, like a doily, or a piece of artwork for the wall, then yes you can get away with working over the ends.

But for something that will be used, handled, dragged around the place…… then this will make sure those ends never see the light of day.

♥ Let’s start right at the beginning.

Firstly, as you are making your project you will need to leave tail ends of at least 6 inches/15cm.

You will need a blunt yarn needle and a pair of sharp scissors.


♥ Securing your centre.

I often hear people say they hate using a magic ring. “they always come undone”.

Well it’s nothing to do with a magic ring, it has to do with how you fasten off and secure the ends.

I have had chain loop starts come undone because I just didn’t secure it properly.

Your centre start will have a lot of pressure on it as you are working, and the bigger the project the more pressure there will be on the centre in years to come.

This is the most common area for work to unravel.


How to make a Magic Ring is covered in another post, and it includes instructions on securing ends.


However I wanted to go into a little more detail here, to make absolutely sure you will never have another one come undone. 

Before you secure your centre, make sure there are no more stitches to make into the centre.

Once you have secured your ends, they are nigh on impossible to undo.!

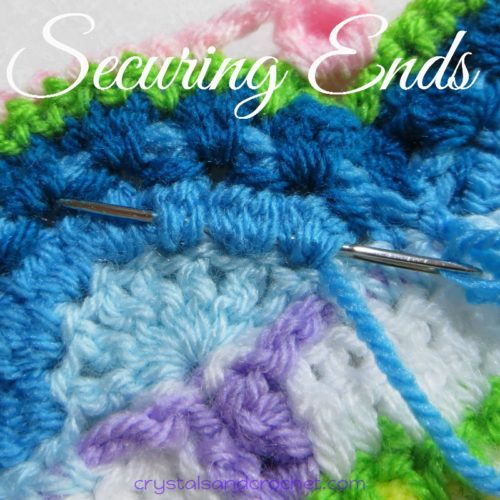
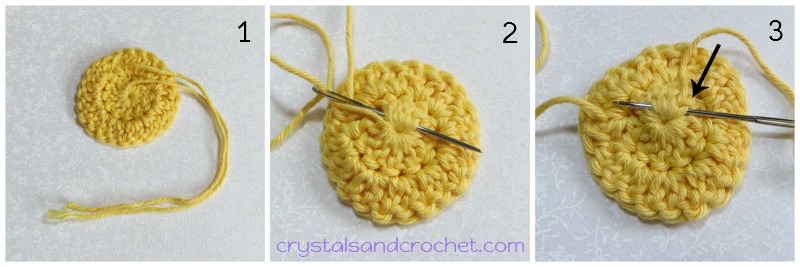
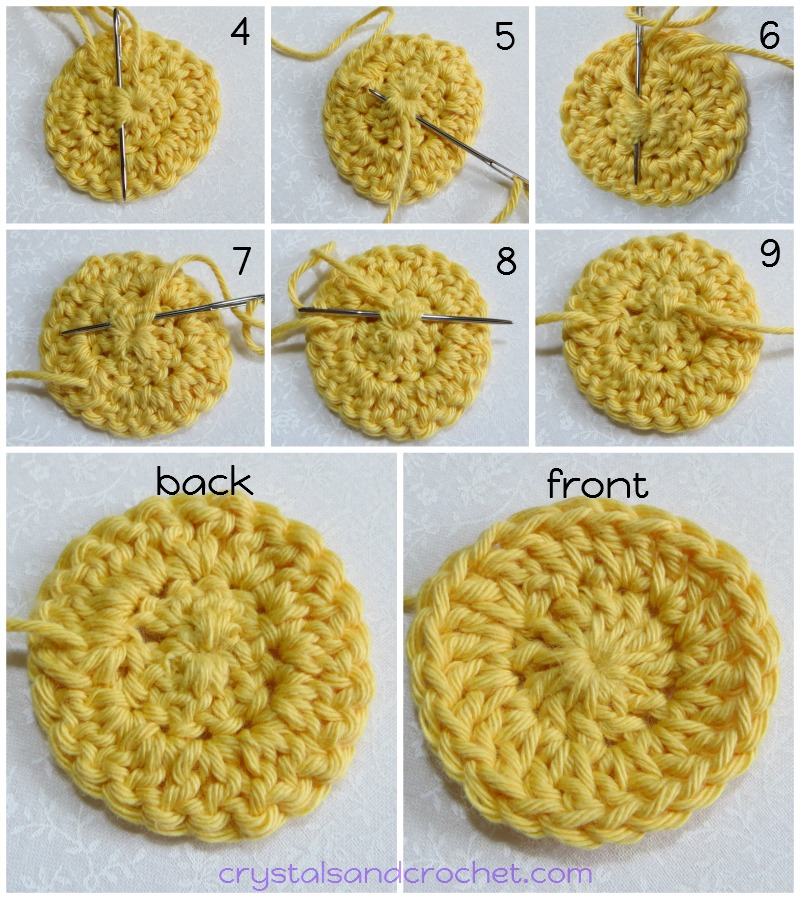
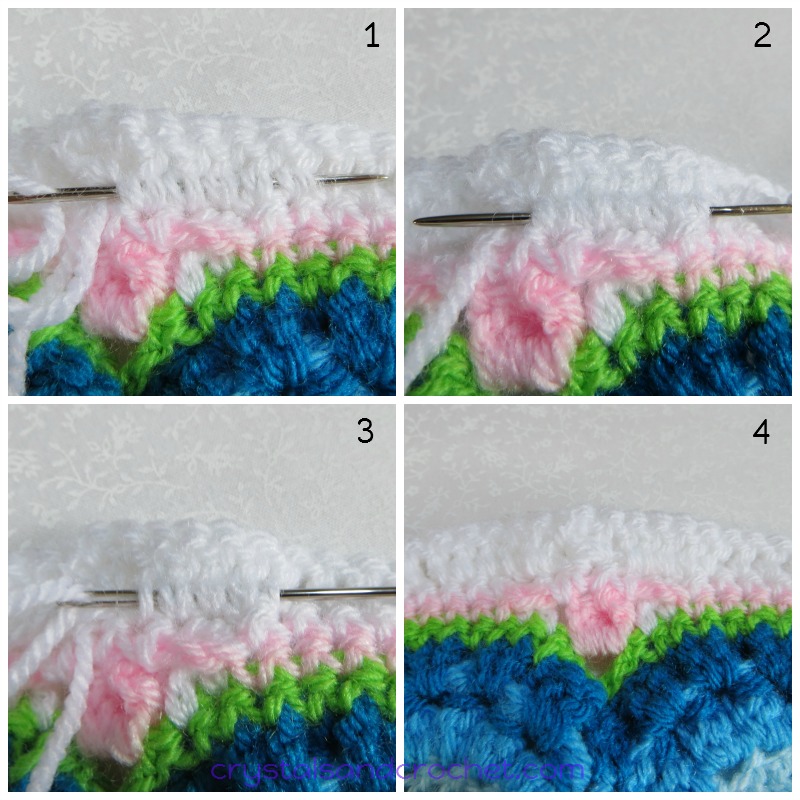
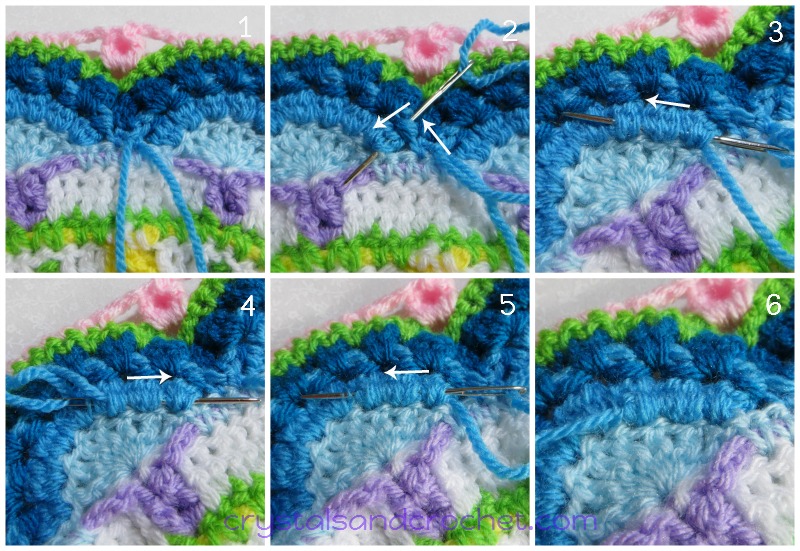
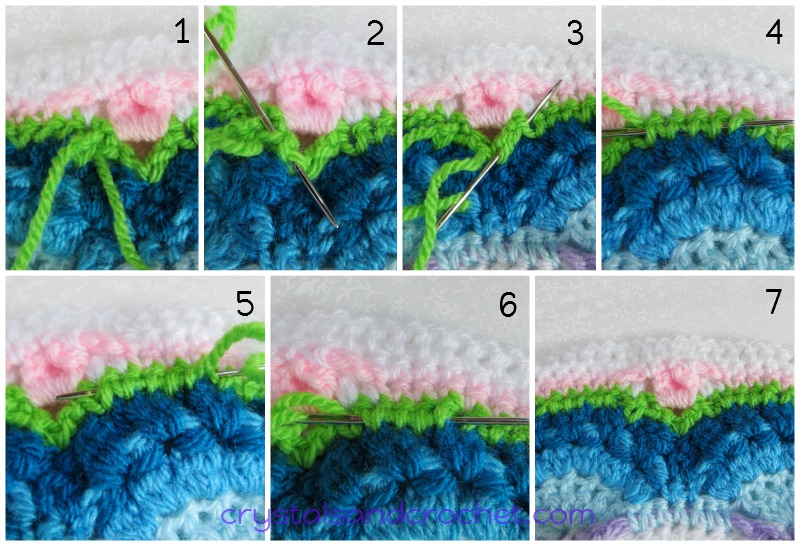
♥ 1. Leave at least 6 inch/15cm tails.

Thread tail end of centre on a yarn needle, the tail end from your last stitch will be worked after the centre.

 2. Work through the base of round 1 stitches, following the same direction as your yarn, [clockwise for right handed and anti-clockwise for left handed].

 3. Turn your needle and work back in the opposite direction, ensuring you go under or over the next thread [see arrow]. This will lock your yarn in place.

 4 to 9. Repeat 3 to 4 times minimum, working around your centre.

Make sure as you change direction each time that you give a gentle pull to make sure you have “caught” the yarn.

Cut off the remaining tail end and presto you have a secure Magic Ring that will not come undone.

Your work should look as neat and tidy on the back as it does on the front. Joins should never be visible from the front of your work.

Work away your other end through the base of the stitches, or where you have both ends to go in the centre [you have only made 1 round in your 1st colour], work through the back of the posts.

♥ Working ends with normal stitches.


In subsequent rounds or when working in rows, of normal stitches, work your tail ends away through the base loops of your stitches.

 1. Thread yarn on to needle, and work it through 5 to 6 stitches.

 2. Turn needle, skip a loop, and work back in opposite direction.

 3. Repeat 3 to 4 times. Make sure as you change direction each time that you give a gentle pull to make sure you have “caught” the yarn.

4. Work 2nd end in the same way, but in the opposite direction.
[1 to the left, and 1 to the right]

DO NOT pull too tightly and restrict the movement of your project.

♥ Working tails away with clusters or bobbles.

This can be a little more tricky!
Remember you do not want to be able to see where your have worked your ends away.

 1. Here we want to work away the mid-blue ends.

 2. Because there is a slight gap between the single crochet and the 1st cluster, take the yarn up to the top of the cluster, then down to the bottom.

 3. Now work through the base of 3 to 4 clusters.

 4. As before, reverse direction, ensuring you have caught the yarn.

 5. Reverse direction a 3rd time, ensuring you have caught the yarn.

 6. Cut your tail end, and work the 2nd end in exactly the same way.

♥ Working away tails where there is a gap or space in your stitches.

This can be the most tricky of all, to ensure you can not see where you have worked away your ends, either from the front or back of your work. But, once you understand the basics, your own creativity will help you.

With this example, the ends are just after a V-stitch.

You will be able to work one side as normal, working away from the V-stitch.
However, with the end which needs to go in the direction of the V-stitch, you have a choice. Either, work through the base of the cluster/popcorn/puff stitch which has been made into the V-stitch or follow my instructions below.

 2, 3. With your needle threaded, take the yarn down through the 1st leg of the V-stitch, to the bottom, and then back up the other leg to the top.

 4 to 7. Continue to work away ends, alternating direction, as normal under the bottom loops of the stitches.


Leave at least 6 inches/16 cm tails, to allow you to work easily.

Remember each time you change direction with your needle it needs to go in a slightly different place, to securely hold the yarn in place.

Always make sure you have double checked your stitch count, before you work away your ends.

My personal preference is to work 4 or 5 rows or rounds, before I work away ends.

Leaving all the ends until the end of a project just makes it seem like a huge job!
Better to do a few at a time. 


 All of my tutorials are free and are written or recorded using US terminology.

  If you need help and advice, the quickest way to find support is to join Helen’s Hookaholics Facebook group. There you will find a very supportive group of likeminded people. It’s also a great place to share your crystalsandcrochet makes, and see what others are making, and see what I am up to.

 If you are not a fan of Facebook you can always email me with any questions you may have by using the contact form here.

Adsense

Partners

My Recommended Suppliers