One of the easiest ways to join your crochet afghan, or granny squares is with a slip stitch join.
In this tutorial I will show you two different ways to use the slip stitch to join squares.
Working through both loops of your stitches, will form a slight ridge, working through only one loop on each stitch will give a flat finish to your work, with a lovely surface crochet chain effect.
One of the things that can really spoil the look of a beautifully made afghan or throw is not joining over the corners properly. I have covered the corners in depth, to help you get beautiful results every time.
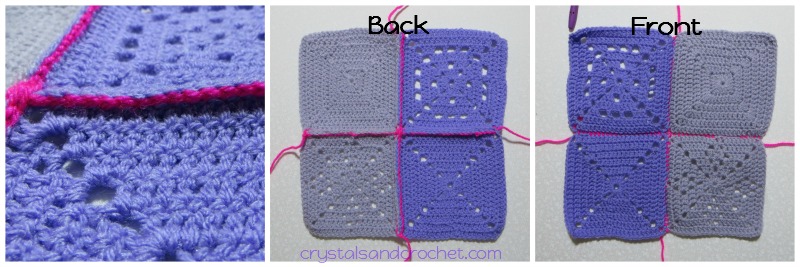
The photos I have used for this tutorial are small squares, and I have used super bright colours to join with so that you can see clearly where the joins are and how they work across the corners. The size of the square does not matter; larger squares just have more repeats of the join than smaller ones do.
♥For all other aspects of joining squares, please check out my main post on Joining Squares.
Standard Slip Stitch Join
♥ You can choose to work with either right or wrong side facing you, all you need to do is choose the effect you want.
♥ Do you want a raised, ridge on the right side of your work, or do you want your join to be very subtle, and almost invisible?
Remember you will work in strips, joining all your squares in one direction, and then carefully turn your work, and again work in strips joining in the opposite direction.
Photo 1-3
Starting in first corner st/ch space, insert hook through loops on both squares, make a slip knot and place on hook, pull through both loops.
Photo 4
Hook through both loops of next stitch on both squares.
Photo 5
Yarn over and pull through all loops.
Photo 6
Continue to work along, making sure you make a sl-st through the corner st/ch space on each pair of squares, until all your strips are joined.
Carefully turn your work, and continue as before.
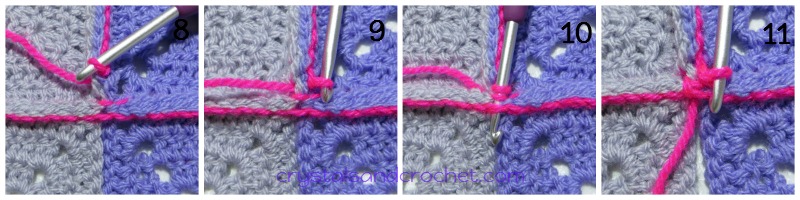
Photo 8 and 9
As you come to a join, ensure you make a sl-st in the corner st/ch space [there will already be a st there].
Photo 10
Hook under the sl-st that crosses the two pairs of squares.
Photo 11
Yarn over and pull through all loops.
♥ Continue until all your squares are joined, work away all tail ends, and you are ready to add a border.
Surface Slip Stitch Join
♥ This is a very simple, decorative, joining technique.
♥ You can use the same yarn colour as the rest of your project, or add a fun element with a contrasting colour.
♥ You may find it feels a little awkward at first, but once you get into the swing of it, I am sure you will love the effect.
♥ Work with right sides facing you, and into the inner loops only.
♥ I prefer to work with my squares on a flat surface.
♥ Keep your working yarn underneath your work at all times.
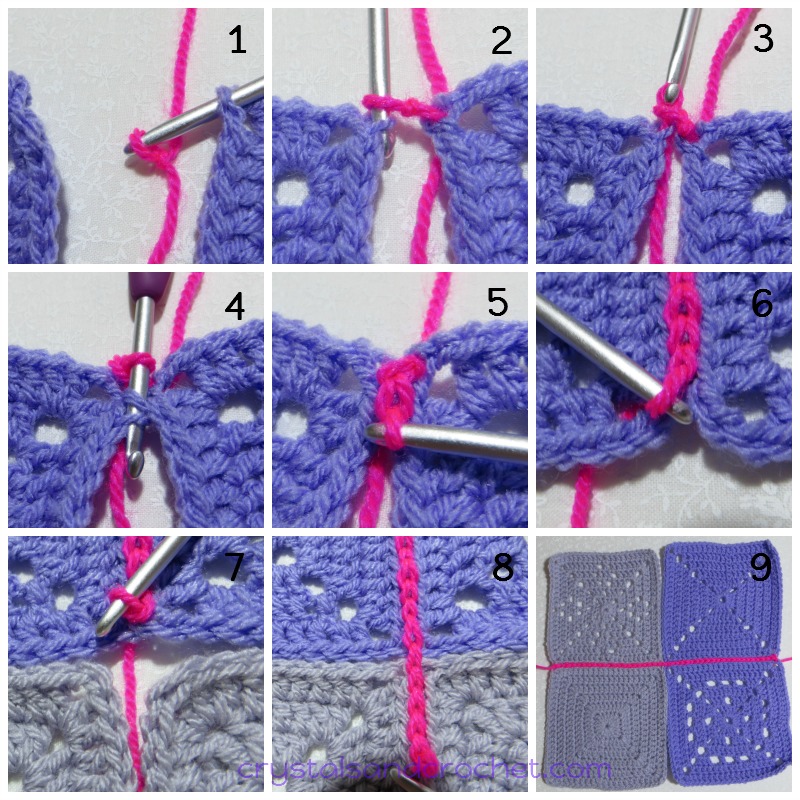
Photo 1
Hook through corner st/ch space [back/inner loop only], make a slip knot and place on hook, and draw through.
Photo 2 and 3
Hook through inner loop of corner st/ch space of next square, yarn over, and pull through.
Photo 4
Hook through inner loops of next stitch on both squares.
Photo 5
Yarn over and pull through all loops on hook.
Photo 6 and 7
Continue to the end of your squares, ensuring your last stitch is in the corner st/ch space.
Photo 8 and 9
Continue on to next pair of squares, working in exactly the same way.
As you come to the end of a strip of squares, make one extra chain, to give an even edge.
Once you have joined all your strips in one direction, you will need to very carefully turn your work.
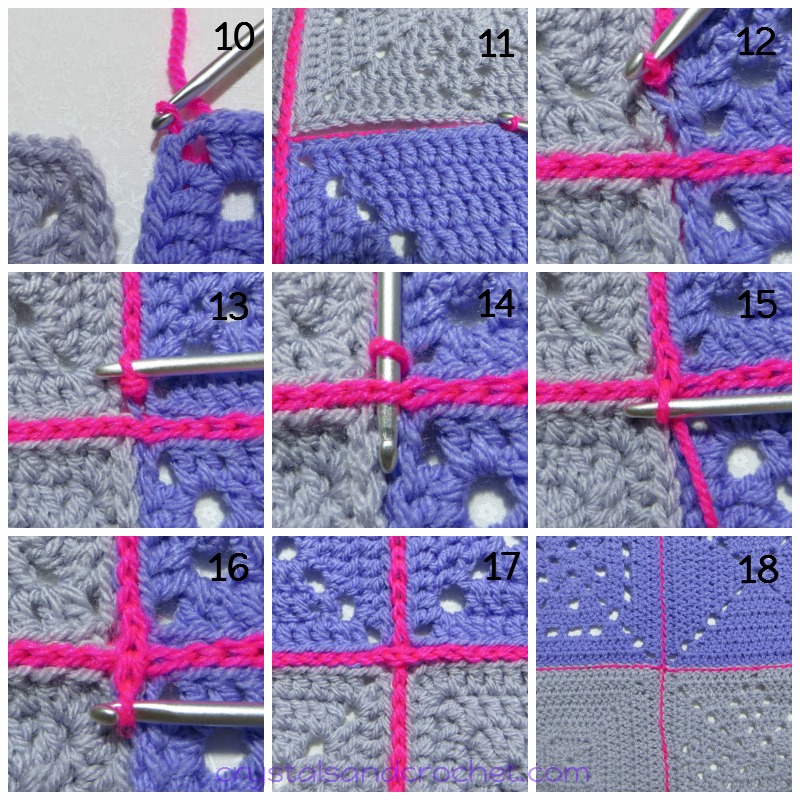
Photo 10 and 11
Begin working as before, ensure your yarn is UNDER your work.
Photo 12 and 13
As you come to a previous join, make sure you complete the last stitch for this pair of squares, right in the corner [there will already be a stitch there].
Photo 14 and 15
Hook under stitch that crosses the two corners, yarn over and pull through.
Photo 16 and 17
Continue working across all squares.
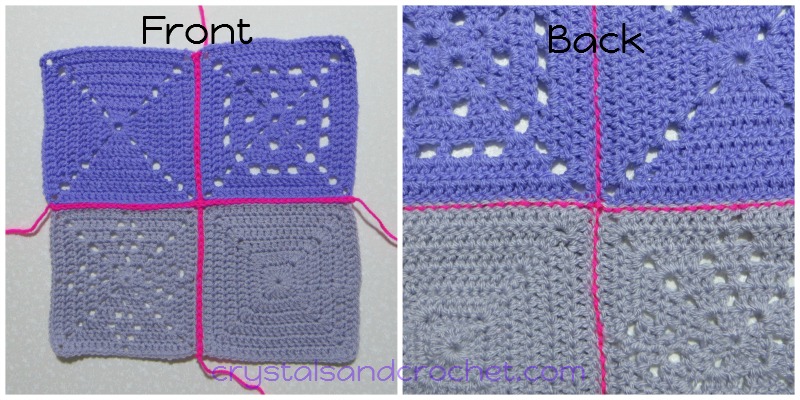
Photo 18
Shows the back of your join.
♥ Continue until all your squares are joined, work away all tail ends, and you are ready to add a border.
Video Tutorial
Zig Zag Slip Stitch Join
A fun variation on the slip stitch join.
♥ If you need help and advice, the quickest way to find support is to join Helen’s Hookaholics Facebook group. There you will find a very supportive group of likeminded people. It’s also a great place to share your crystalsandcrochet makes, and see what others are making, and see what I am up to.
♥ If you are not a fan of Facebook you can always email me with any questions you may have by using the contact form here.
Adsense
Partners
My Recommended Suppliers
Privacy Overview
This website uses cookies so that we can provide you with the best user experience possible. Cookie information is stored in your browser and performs functions such as recognising you when you return to our website and helping our team to understand which sections of the website you find most interesting and useful.
Strictly Necessary Cookie should be enabled at all times so that we can save your preferences for cookie settings.
If you disable this cookie, we will not be able to save your preferences. This means that every time you visit this website you will need to enable or disable cookies again.